Difference between revisions of "Template:GMS GPRS GNSS HAT Manual"
(→硬件配置) |
m (Text replacement - "47.107.148.244" to "{{SERVERNAME}}") |
||
| (10 intermediate revisions by the same user not shown) | |||
| Line 1: | Line 1: | ||
| − | = | + | =Test it in Windows PC= |
| − | == | + | ==Hardware connection== |
| − | + | This module comes with a power adapter, micro USB cable, GSM antenna, GPS | |
| − | # | + | antenna and Bluetooth antenna. Besides these you should prepare two more things:<br /> |
| − | # | + | #A SIM card, the card should be usable and GPRS access (for testing the GPRS) |
| − | * | + | #An earphone with a microphone on it (For testing Call function) |
| − | * | + | *Insert the SIM card to the card slot, plug the earphone and connect the GSM antenna<br /> |
| − | * | + | *Install CP2102 driver, plug the jumper B, and connect the USB to UART interface of GSM/GPRS/GNSS HAT to PC with a micro USB cable. Then the PWR indicator will keep bright.<br /> |
| + | *Open Device Manager to get the corresponding COM port number of CP2102. For example, it is COM7 as below. Users need to choose the correct port according to the Manager. <br /> | ||
[[file:GSM-GNSS-GPRS_COM.png|center|500px]] | [[file:GSM-GNSS-GPRS_COM.png|center|500px]] | ||
| − | * | + | *Press the PWRKEY button and hold for 1s, the NET indicator will blink as below.<br /> |
| − | + | : Generally, the NET indicator will fast flash firstly (1 time per second), which means that the module has not logged in the Network. After logging in, the indicator become to flash slowly (1 time every three seconds). Up to the local GSM network, this process that logging in will last several seconds to dozens of seconds.<br /> | |
| − | + | If you take too much time to log in and failed, please check that whether the GSM antenna is connected correctly, and whether the SIM card is usable and inserted correctly.<br /> | |
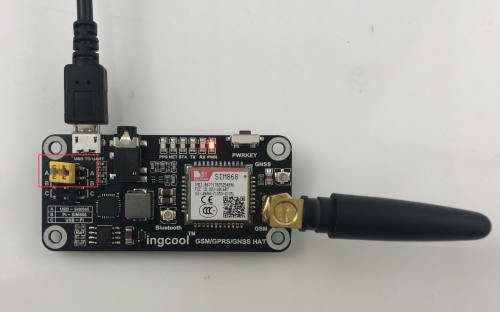
| − | + | Set the jumper to A<br /> | |
| − | : | + | :[[file:GSM-GPRS-GNSS HAT-1.png|500px]] |
| − | [[file:GSM-GPRS-GNSS HAT-1.png|500px]] | ||
| − | == | + | ==Test GSM== |
<font color="#FF0000"> | <font color="#FF0000"> | ||
| − | AT | + | For more details of AT commands, please refer to: SIM800 Series_AT Command Manual_V1.10<br /> |
</font> | </font> | ||
| − | === | + | ===Take calls=== |
| − | # | + | #Insert the SIM card, connect the GSM antenna and TLL serial wires correctly. Then power on the board; |
| − | # | + | #Check whether the indicators blink correctly (PWR and STA keep bright, NET flashes every three seconds). |
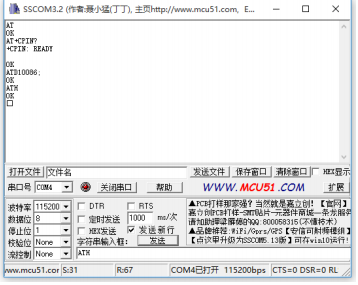
| − | # | + | # Send “AT+CPIN?” and Enter to query the status of the SIM card. Getting “+CPIN: READY” if the SIM card is ready |
| − | # | + | #Call number: for example, “ATD10086;” (10086 is the number of China Mobile Communications Corporation) |
| − | # | + | #Send “ATH” and Enter to hang up the call, as below: |
| − | [[file:GSM-GNSS-GPRS_Callphone.png|center| | + | [[file:GSM-GNSS-GPRS_Callphone.png|center|500px]] |
| − | === | + | ===Answer calls=== |
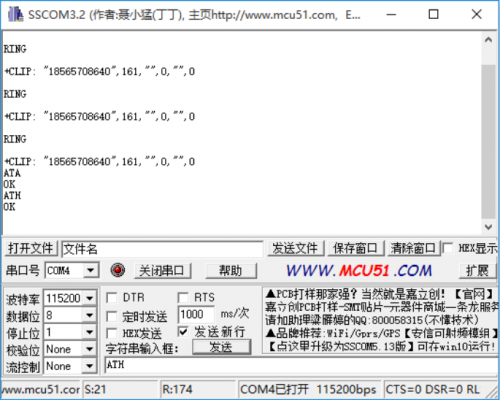
| − | # | + | #Enable CLIP notification: AT+CLIP=1 then Enter |
| − | # | + | #Hang up: ATH then Enter |
[[file:GSM-GNSS-GPRS_answercall.png|center|500px]] | [[file:GSM-GNSS-GPRS_answercall.png|center|500px]] | ||
| − | === | + | ===Send SMS=== |
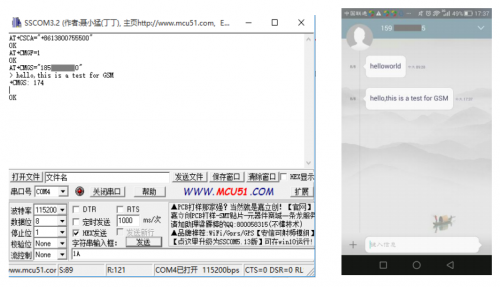
| − | # | + | #Set the local SMSC:AT+CSCA="+8613800755500" then Enter, get response “OK”. Note: The SMSC will be different in different areas. Here, it is ShenzhenChina as examples; |
| − | + | #AT+CMGF=1: Set SMS to TEXT mode; | |
| − | + | #AT+CMGS="xxxxxxxxxxx” then Enter, set the number of receivers, then you will get a response: >, edit the content of the message (needn’t Enter at the end). After editing, GSM/GPRS/GNSS HAT User Manual send 1A in HEX format to send the message (0x1A is key value of “CTRL+Z”, it will tell the module to send). If the message is sent successfully, the module will get the reply +CNGS: 174 as below figures | |
| − | #AT+CMGF= | + | [[file:GSM-GNSS-GPRS_sendMessage.png|center|500px]] |
| − | #AT+CMGS=" | ||
| − | |||
| − | [[file:GSM-GNSS-GPRS_sendMessage.png|center| | ||
| − | === | + | ===Receiver SMS== |
| − | # | + | #Send a message “this is a receive test” to the GSM/GPRS/GSNN HAT from your phone |
| − | + | #. While receiving messages, the module will report it to UART: “SM”, 3, it means that there are 3 messages in SM, and the message we receive just now is the third message. | |
| − | # | + | #Reading messages:AT+CMGR=3 to read the third message (AT+CMGL="ALL" to read all messages) |
| − | # | + | #Deleting message:AT+CMGD=3, to delete the message as below |
| − | # | + | [[file:GSM-GNSS-GPRS_revMessage.png|center|500px]] |
| − | [[file:GSM-GNSS-GPRS_revMessage.png|center| | ||
| − | == | + | ==Test GPS== |
| − | |||
| − | |||
| − | |||
| − | |||
| − | |||
| − | |||
| − | |||
| − | |||
| − | |||
| − | |||
| − | |||
| − | |||
| − | |||
<font color="#FF0000"> | <font color="#FF0000"> | ||
| − | AT | + | For more details of AT commands, please refer to:SIM868 Series GNSS Application Note V1.00<br /> |
</font> | </font> | ||
| − | # | + | #Connecting the GPS antenna, and place the receiver on open area to receive GPS signal |
| − | # | + | #Turn on power of GNSS: AT+CGNSPWR=1 |
| − | # | + | #Check the baud rate: AT+CGNSIPR? |
| − | # | + | #Start to sending data received to UART: AT+CGNSTST=1: |
[[file:GSM-GNSS-GPRS_GPS.png|center|900px]] | [[file:GSM-GNSS-GPRS_GPS.png|center|900px]] | ||
| − | * | + | *Close the Com Assistant software SSCOM. Open u-center and set the Port and Baudrate. The Port is the port number recognized by PC. Set Baudrate as the value we got before (You can configure in Receiver option or click icons on the toolbar directly):<br /> |
[[file:GSM-GNSS-GPRS_GPS_u-center.png|center|900px]]<br /> | [[file:GSM-GNSS-GPRS_GPS_u-center.png|center|900px]]<br /> | ||
| − | * | + | *Click Connect, then the GNSS information will be printed as below<br /> |
[[file:GSM-GNSS-GPRS_GPS_u-center2.png|center|900px]]<br /> | [[file:GSM-GNSS-GPRS_GPS_u-center2.png|center|900px]]<br /> | ||
| − | ==GPRS | + | ==Test GPRS== |
<font color="#FF0000"> | <font color="#FF0000"> | ||
| − | AT | + | For more details of AT commands, please refer to:SIM800 Series_AT Command Manual_V1.10<br /> |
</font> | </font> | ||
| − | === | + | ===Seyying local virtual server=== |
| − | + | The virtual server defines the mapping between service ports of WAN and web servers of LAN. All requests from the Internet to service ports of WAN will be redirected to the computer (web servers of LAN) specified by the server IP. (Please refer to guide manual of your router)<br /> | |
| − | # | + | #Log in Management Console of your router with a browser (read your router’s guide manual for specific address) |
| − | # | + | #. Set Port:5000 (The Port can’t conflict with others. Here we set it to 5000) |
| − | # | + | #Set LAN IP address for your computer (you can run CMD on your computer, and execute command ipconfig to inquiry the address of IPv4), 192.168.1.14 as examples |
[[file:GSM-GNSS-GPRS_gnss_ip.png|center|900px]]<br /> | [[file:GSM-GNSS-GPRS_gnss_ip.png|center|900px]]<br /> | ||
| − | === | + | ===Get WAN IP=== |
| − | + | You can search “IP” on a browser to get WAN IP address of your PC as below: (This method is only workable in China)<br /> | |
[[file:GSM-GNSS-GPRS_gnss_ip2.png|center|900px]]<br /> | [[file:GSM-GNSS-GPRS_gnss_ip2.png|center|900px]]<br /> | ||
| − | === | + | ===Set GPRS=== |
| − | #AT+CSQ | + | #AT+CSQ inquiry the quality of the signal. The first parameter of response is the signal quality (Max is 31). The signal is stronger, the value bigger. |
| − | #AT+CREG? | + | #AT+CREG? Check Network registration. If the second parameter of response is 1 or 5, it means that the Network has been registered successfully |
| − | #AT+CGATT? | + | #AT+CGATT? AT+CGATT? Check the state of GPRS attachment |
| − | #AT+CSTT="CMNET" | + | #AT+CSTT="CMNET" Set the Network according to the actual situation. Here we use CMNET |
| − | #AT+CIICR | + | #AT+CIICR Bring up a wireless connection with GPRS |
| − | #AT+CIFSR | + | #AT+CIFSR Get the local IP address |
| − | #AT+CIPSTART="TCP","113.81.232.4",5000 | + | #AT+CIPSTART="TCP","113.81.232.4",5000 Establish TCP/IP connection |
| − | === | + | ===Send data=== |
| − | #AT+CIPSEND | + | #AT+CIPSEND module is going to send data to the server |
| − | # | + | #After getting the response >, edit the contents of the message (has been converted) without Enter at the end. Then send 1A in HEX format as below |
| − | # | + | #If the data sent successfully, the server will receive the data |
[[file:GSM-GNSS-GPRS_gnss_sendmsg.png|center|900px]]<br /> | [[file:GSM-GNSS-GPRS_gnss_sendmsg.png|center|900px]]<br /> | ||
| − | === | + | ===Receive data=== |
| − | # | + | #Choose the IP address of module on Peers input box |
| − | + | #Input the data which you want to send: hello, I am a server, please receive my message | |
| − | # | + | #Click Send button, you can see that module receive the data |
| − | # | ||
[[file:GSM-GNSS-GPRS_gnss_revmsg.png|center|900px]]<br /> | [[file:GSM-GNSS-GPRS_gnss_revmsg.png|center|900px]]<br /> | ||
| − | === | + | ===Deactivate connection=== |
| − | # | + | #Send AT+CIPCLOSE or AT+CIPSHUT to deactivate the connection. |
| − | + | ==Test Bluetooth== | |
| − | == | ||
<font color="#FF0000"> | <font color="#FF0000"> | ||
| − | + | For more information about AT command: Please refer to: SIM800 series_BT_application_V1.04 <br /> | |
</font> | </font> | ||
| − | === | + | ===Setting=== |
| − | # | + | #Connecting the Bluetooth antenna to the GSM/GPRS/GNSS HAT. Open the Bluetooth service of your phone and set it visible to all nearby Bluetooth. |
| − | #AT+BTPOWER= | + | #AT+BTPOWER=1 Turn on Bluetooth |
| − | #AT+BTHOST? | + | #AT+BTHOST?,Enquiry the name and MAC address of the module, you can also use |
| − | #AT+BTSCAN=1,10 | + | #AT+BTSCAN=1,10 ,To search available nearby devices. The search time is 10s. During searching, the module will print the information of the available devices to UART. Examples: +BTSCAN: 0,2,"H60-L01",50:a7:2b:bb:a4:50,-47, “0,2” is the ID of this device;“H60-L01” is name of device; “50:a7:2b:bb:a4:50” is MAC address of device;“-47” is the RSSI value. |
| − | #AT+BTPAIR=0,2 , | + | #AT+BTPAIR=0,2, Pair with an available device, the second parameter here is the ID we got at step 4. If you get the response Error, just use AT+BTUNPAIR to delete the pairing data and pair again. |
| − | # | + | #After sending the pair command successfully, you can see that your telephone prompt the pairing request. Then you need to click Pair to accept the request and send AT+BTPAIR on PC to confirm the pairing behavior. With these, module pair with the telephone successfully. If you don’t send the AT command to confirm pairing, the telephone will prompt information that fails to pair after a while. In this case, you need to send the pair command again. You can also use the telephone to send the pairing request, then input AT+BTPAIR=1,1 to confirm it. |
[[file:GSM-GNSS-GPRS_bt_config.png|center|900px]]<br /> | [[file:GSM-GNSS-GPRS_bt_config.png|center|900px]]<br /> | ||
| − | === | + | ===Connecting=== |
| − | * | + | *To test Bluetooth of GSM/GPRS/GNSS, you should use the Bluetooth APP. Scanning the QR code below to download the APP, then you can use its Serial function to test. (The APP is just used for simply testing) |
| − | |||
| − | |||
| − | |||
| − | |||
| − | |||
| − | |||
| − | |||
| − | = | + | #Open the APP, click the SCAN button on the upper right to scan the available devices. Then choose “SIM868” (“SIM868” is default Bluetooth name of GSM/GPRS/GNSS HAT) and click UART. Then you will get the information that +BTCONNECTING on the COM assistant, which means there is a connecting request. If you don’t reply to it for a while, the APP will prompt that connecting failed. And failed information “+BTDISCONN” will be printed on PC |
| − | + | #Connecting again, send command AT+BTACPT=1 to confirm and accept Bluetooth connection. You can see that +BRCONNECT is printed on PC shows that succeed in SPP connecting. Then you can send data to the module with the APP. | |
| + | #While receiving the data send from the telephone, the data will be printed with ID of the device, the length of string, and the content on PC. | ||
| + | #Send AT+BTSPPSEND command to transmit data. After getting the response >, input the content without Enter at the end. Send 1A in HEX to begin to transmit the data. Then you can see that the data are received by your phone | ||
| − | == | + | =Workin with Raspberry Pi= |
| − | * | + | ==Enable serial port== |
| + | *Open a terminal and configure interface by the following commands | ||
| + | <pre> | ||
| + | sudo raspi-config | ||
| + | </pre> | ||
| + | *Choose Interfacing Options -> Serial->No->Yes | ||
| + | *Restart Raspberry Pi | ||
| + | <pre> | ||
| + | sudo reboot | ||
| + | </pre> | ||
| + | ==Install libtaties== | ||
| + | *Install Python libraries | ||
<pre> | <pre> | ||
sudo apt-get update | sudo apt-get update | ||
| Line 144: | Line 131: | ||
</pre> | </pre> | ||
| − | == | + | ==minicom test== |
| − | * | + | *Install minicom tool and test |
<pre> | <pre> | ||
sudo apt-get install minicom | sudo apt-get install minicom | ||
| − | # | + | # For Pi 3B\3B+\4B, |
sudo minicom -D /dev/ttyS0 -b 9600 | sudo minicom -D /dev/ttyS0 -b 9600 | ||
| − | # | + | # For Pi ZERO\2B |
sudo minicom -D /dev/ttyAMA0 -b 9600 | sudo minicom -D /dev/ttyAMA0 -b 9600 | ||
| − | # | + | # If you want to test with the USB port of Pi, you can change the jumper to A: |
sudo minicom -D /dev/ttyUSB0 -b 9600 | sudo minicom -D /dev/ttyUSB0 -b 9600 | ||
</pre> | </pre> | ||
| − | + | The default baud rate of minicom is 115200,If you want to change it to 9600, you can add parameter to the command: -b 9600. ttyS0 is the serial port of Pi 3B/3B+, ttyAMA0 of Pi 2B/Zero. If you use USB interface, the port may be ttyUSB*<br> | |
| − | + | Here we test Bluetooth as example:<br> | |
[[file:GSM-GNSS-GPRS_rpi_minicom.png|center|900px]]<br> | [[file:GSM-GNSS-GPRS_rpi_minicom.png|center|900px]]<br> | ||
| − | |||
| − | == | + | ==Demo codes== |
| − | * | + | *Download |
<pre> | <pre> | ||
sudo apt-get install p7zip | sudo apt-get install p7zip | ||
| − | wget http:// | + | wget http://{{SERVERNAME}}/w/images/1/1f/GSM-GPRS-GNSS-HAT-Code.7z |
7zr x GSM-GPRS-GNSS-HAT-Code.7z -r -o./GSM-GPRS-GNSS-HAT-Code | 7zr x GSM-GPRS-GNSS-HAT-Code.7z -r -o./GSM-GPRS-GNSS-HAT-Code | ||
sudo chmod 777 -R GSM-GPRS-GNSS-HAT-Code | sudo chmod 777 -R GSM-GPRS-GNSS-HAT-Code | ||
| Line 170: | Line 156: | ||
</pre> | </pre> | ||
| − | * | + | *We provide some python codes for testing |
<pre> | <pre> | ||
sudo python call_phone.py | sudo python call_phone.py | ||
| Line 176: | Line 162: | ||
sudo python gps.py | sudo python gps.py | ||
</pre> | </pre> | ||
| + | |||
| + | =Resources= | ||
| + | ==Examples== | ||
| + | *[http://{{SERVERNAME}}/w/images/1/1f/GSM-GPRS-GNSS-HAT-Code.7z Demo codes] | ||
| + | ==Software== | ||
| + | *[http://{{SERVERNAME}}/w/images/8/88/TCP232.7z TCP232 Software] | ||
| + | *[http://{{SERVERNAME}}/w/images/c/c1/Chiness_Unicode.zip Fonts convertor] | ||
| + | *[http://{{SERVERNAME}}/w/images/3/31/U-center_v8.12.7z U-center] | ||
| + | *[http://{{SERVERNAME}}/w/images/d/d5/SSCOM.rar SSCOM Software] | ||
| + | ==Documents== | ||
| + | *[http://{{SERVERNAME}}/w/images/2/20/GSM-GPRS-GNSS-HAT-Schematic_.pdf Schematic] | ||
| + | *[http://{{SERVERNAME}}/w/images/6/6f/SIM868_Reference_Design_V1.01%28160310%29.pdf SIM868_Reference Design V1.01(160310).pdf] | ||
| + | *[http://{{SERVERNAME}}/w/images/f/fe/SIM868_NMEA_Message_Specification_V1.00.pdf SIM868 NMEA Message Specification V1.00.pdf] | ||
| + | *[http://{{SERVERNAME}}/w/images/2/20/SIM800_Series_AT_Command_Manual_V1.09.pdf SIM800 Series AT Command Manual V1.09.pdf] | ||
| + | *[http://{{SERVERNAME}}/w/images/3/3d/SIM868_GNSS_Application_Note_V1.00.pdf SIM868 GNSS Application Note V1.00.pdf] | ||
| + | *[http://{{SERVERNAME}}/w/images/b/b6/SIM868_GNSS_AGPS_Application.pdf SIM868 GNSS AGPS Application.pdf] | ||
Latest revision as of 11:30, 11 July 2020
Contents
Test it in Windows PC
Hardware connection
This module comes with a power adapter, micro USB cable, GSM antenna, GPS
antenna and Bluetooth antenna. Besides these you should prepare two more things:
- A SIM card, the card should be usable and GPRS access (for testing the GPRS)
- An earphone with a microphone on it (For testing Call function)
- Insert the SIM card to the card slot, plug the earphone and connect the GSM antenna
- Install CP2102 driver, plug the jumper B, and connect the USB to UART interface of GSM/GPRS/GNSS HAT to PC with a micro USB cable. Then the PWR indicator will keep bright.
- Open Device Manager to get the corresponding COM port number of CP2102. For example, it is COM7 as below. Users need to choose the correct port according to the Manager.
- Press the PWRKEY button and hold for 1s, the NET indicator will blink as below.
- Generally, the NET indicator will fast flash firstly (1 time per second), which means that the module has not logged in the Network. After logging in, the indicator become to flash slowly (1 time every three seconds). Up to the local GSM network, this process that logging in will last several seconds to dozens of seconds.
If you take too much time to log in and failed, please check that whether the GSM antenna is connected correctly, and whether the SIM card is usable and inserted correctly.
Set the jumper to A
Test GSM
For more details of AT commands, please refer to: SIM800 Series_AT Command Manual_V1.10
Take calls
- Insert the SIM card, connect the GSM antenna and TLL serial wires correctly. Then power on the board;
- Check whether the indicators blink correctly (PWR and STA keep bright, NET flashes every three seconds).
- Send “AT+CPIN?” and Enter to query the status of the SIM card. Getting “+CPIN: READY” if the SIM card is ready
- Call number: for example, “ATD10086;” (10086 is the number of China Mobile Communications Corporation)
- Send “ATH” and Enter to hang up the call, as below:
Answer calls
- Enable CLIP notification: AT+CLIP=1 then Enter
- Hang up: ATH then Enter
Send SMS
- Set the local SMSC:AT+CSCA="+8613800755500" then Enter, get response “OK”. Note: The SMSC will be different in different areas. Here, it is ShenzhenChina as examples;
- AT+CMGF=1: Set SMS to TEXT mode;
- AT+CMGS="xxxxxxxxxxx” then Enter, set the number of receivers, then you will get a response: >, edit the content of the message (needn’t Enter at the end). After editing, GSM/GPRS/GNSS HAT User Manual send 1A in HEX format to send the message (0x1A is key value of “CTRL+Z”, it will tell the module to send). If the message is sent successfully, the module will get the reply +CNGS: 174 as below figures
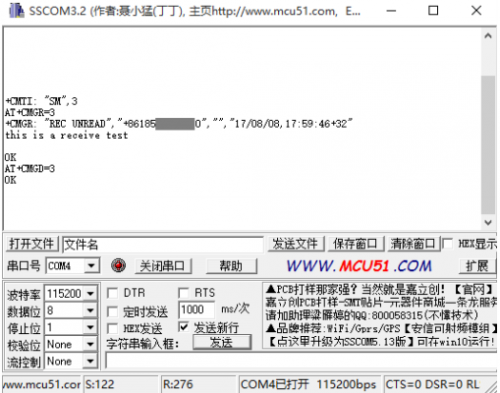
=Receiver SMS
- Send a message “this is a receive test” to the GSM/GPRS/GSNN HAT from your phone
- . While receiving messages, the module will report it to UART: “SM”, 3, it means that there are 3 messages in SM, and the message we receive just now is the third message.
- Reading messages:AT+CMGR=3 to read the third message (AT+CMGL="ALL" to read all messages)
- Deleting message:AT+CMGD=3, to delete the message as below
Test GPS
For more details of AT commands, please refer to:SIM868 Series GNSS Application Note V1.00
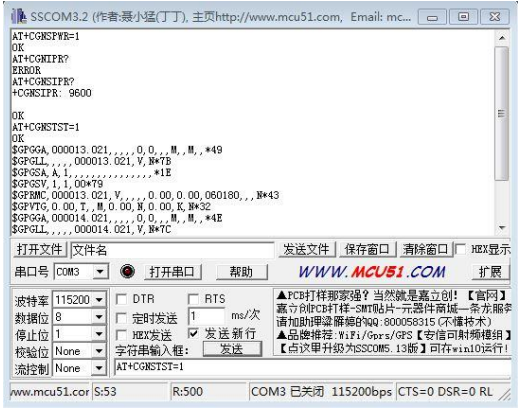
- Connecting the GPS antenna, and place the receiver on open area to receive GPS signal
- Turn on power of GNSS: AT+CGNSPWR=1
- Check the baud rate: AT+CGNSIPR?
- Start to sending data received to UART: AT+CGNSTST=1:
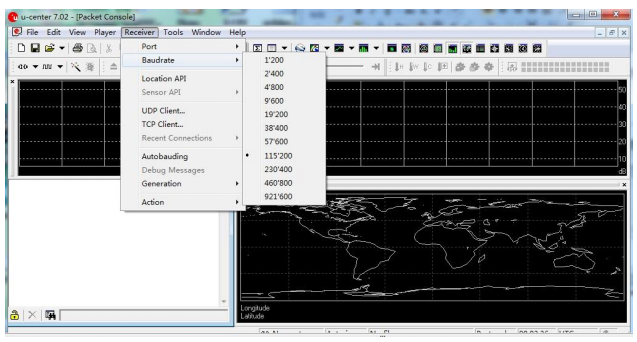
- Close the Com Assistant software SSCOM. Open u-center and set the Port and Baudrate. The Port is the port number recognized by PC. Set Baudrate as the value we got before (You can configure in Receiver option or click icons on the toolbar directly):
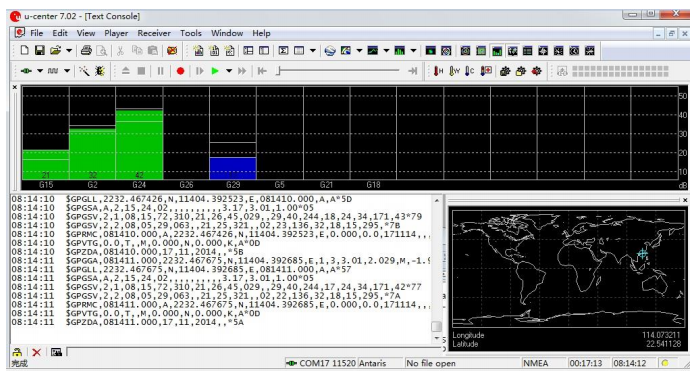
- Click Connect, then the GNSS information will be printed as below
Test GPRS
For more details of AT commands, please refer to:SIM800 Series_AT Command Manual_V1.10
Seyying local virtual server
The virtual server defines the mapping between service ports of WAN and web servers of LAN. All requests from the Internet to service ports of WAN will be redirected to the computer (web servers of LAN) specified by the server IP. (Please refer to guide manual of your router)
- Log in Management Console of your router with a browser (read your router’s guide manual for specific address)
- . Set Port:5000 (The Port can’t conflict with others. Here we set it to 5000)
- Set LAN IP address for your computer (you can run CMD on your computer, and execute command ipconfig to inquiry the address of IPv4), 192.168.1.14 as examples
Get WAN IP
You can search “IP” on a browser to get WAN IP address of your PC as below: (This method is only workable in China)
Set GPRS
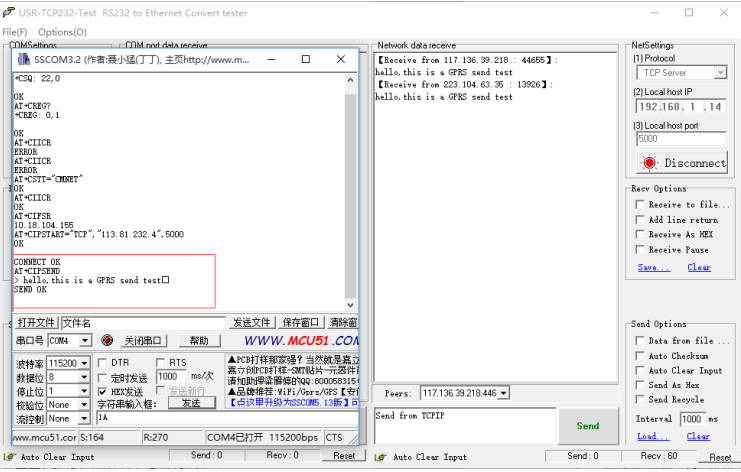
- AT+CSQ inquiry the quality of the signal. The first parameter of response is the signal quality (Max is 31). The signal is stronger, the value bigger.
- AT+CREG? Check Network registration. If the second parameter of response is 1 or 5, it means that the Network has been registered successfully
- AT+CGATT? AT+CGATT? Check the state of GPRS attachment
- AT+CSTT="CMNET" Set the Network according to the actual situation. Here we use CMNET
- AT+CIICR Bring up a wireless connection with GPRS
- AT+CIFSR Get the local IP address
- AT+CIPSTART="TCP","113.81.232.4",5000 Establish TCP/IP connection
Send data
- AT+CIPSEND module is going to send data to the server
- After getting the response >, edit the contents of the message (has been converted) without Enter at the end. Then send 1A in HEX format as below
- If the data sent successfully, the server will receive the data
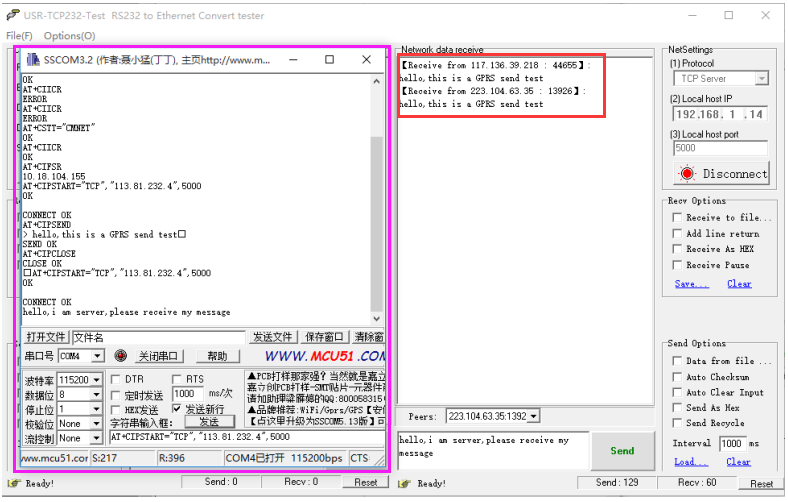
Receive data
- Choose the IP address of module on Peers input box
- Input the data which you want to send: hello, I am a server, please receive my message
- Click Send button, you can see that module receive the data
Deactivate connection
- Send AT+CIPCLOSE or AT+CIPSHUT to deactivate the connection.
Test Bluetooth
For more information about AT command: Please refer to: SIM800 series_BT_application_V1.04
Setting
- Connecting the Bluetooth antenna to the GSM/GPRS/GNSS HAT. Open the Bluetooth service of your phone and set it visible to all nearby Bluetooth.
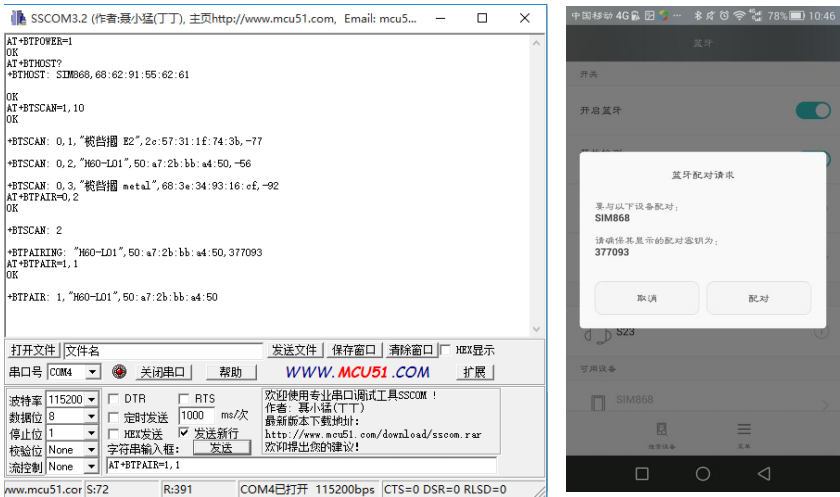
- AT+BTPOWER=1 Turn on Bluetooth
- AT+BTHOST?,Enquiry the name and MAC address of the module, you can also use
- AT+BTSCAN=1,10 ,To search available nearby devices. The search time is 10s. During searching, the module will print the information of the available devices to UART. Examples: +BTSCAN: 0,2,"H60-L01",50:a7:2b:bb:a4:50,-47, “0,2” is the ID of this device;“H60-L01” is name of device; “50:a7:2b:bb:a4:50” is MAC address of device;“-47” is the RSSI value.
- AT+BTPAIR=0,2, Pair with an available device, the second parameter here is the ID we got at step 4. If you get the response Error, just use AT+BTUNPAIR to delete the pairing data and pair again.
- After sending the pair command successfully, you can see that your telephone prompt the pairing request. Then you need to click Pair to accept the request and send AT+BTPAIR on PC to confirm the pairing behavior. With these, module pair with the telephone successfully. If you don’t send the AT command to confirm pairing, the telephone will prompt information that fails to pair after a while. In this case, you need to send the pair command again. You can also use the telephone to send the pairing request, then input AT+BTPAIR=1,1 to confirm it.
Connecting
- To test Bluetooth of GSM/GPRS/GNSS, you should use the Bluetooth APP. Scanning the QR code below to download the APP, then you can use its Serial function to test. (The APP is just used for simply testing)
- Open the APP, click the SCAN button on the upper right to scan the available devices. Then choose “SIM868” (“SIM868” is default Bluetooth name of GSM/GPRS/GNSS HAT) and click UART. Then you will get the information that +BTCONNECTING on the COM assistant, which means there is a connecting request. If you don’t reply to it for a while, the APP will prompt that connecting failed. And failed information “+BTDISCONN” will be printed on PC
- Connecting again, send command AT+BTACPT=1 to confirm and accept Bluetooth connection. You can see that +BRCONNECT is printed on PC shows that succeed in SPP connecting. Then you can send data to the module with the APP.
- While receiving the data send from the telephone, the data will be printed with ID of the device, the length of string, and the content on PC.
- Send AT+BTSPPSEND command to transmit data. After getting the response >, input the content without Enter at the end. Send 1A in HEX to begin to transmit the data. Then you can see that the data are received by your phone
Workin with Raspberry Pi
Enable serial port
- Open a terminal and configure interface by the following commands
sudo raspi-config
- Choose Interfacing Options -> Serial->No->Yes
- Restart Raspberry Pi
sudo reboot
Install libtaties
- Install Python libraries
sudo apt-get update
sudo pip install RPi.GPIO
sudo apt-get install python-serial
minicom test
- Install minicom tool and test
sudo apt-get install minicom
# For Pi 3B\3B+\4B,
sudo minicom -D /dev/ttyS0 -b 9600
# For Pi ZERO\2B
sudo minicom -D /dev/ttyAMA0 -b 9600
# If you want to test with the USB port of Pi, you can change the jumper to A:
sudo minicom -D /dev/ttyUSB0 -b 9600
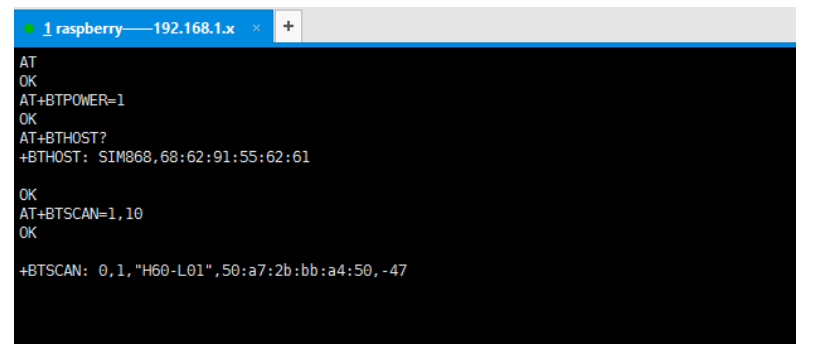
The default baud rate of minicom is 115200,If you want to change it to 9600, you can add parameter to the command: -b 9600. ttyS0 is the serial port of Pi 3B/3B+, ttyAMA0 of Pi 2B/Zero. If you use USB interface, the port may be ttyUSB*
Here we test Bluetooth as example:
Demo codes
- Download
sudo apt-get install p7zip
wget  http://{{SERVERNAME}}/w/images/1/1f/GSM-GPRS-GNSS-HAT-Code.7z
7zr x GSM-GPRS-GNSS-HAT-Code.7z -r -o./GSM-GPRS-GNSS-HAT-Code
sudo chmod 777 -R GSM-GPRS-GNSS-HAT-Code
cd GSM-GPRS-GNSS-HAT-Code/GSM-GPRS-GNSS-HAT-Code/Raspberry\ Pi/
- We provide some python codes for testing
sudo python call_phone.py
sudo python send_message.py
sudo python gps.py

